Easy Crispy Fried Mac and Cheese Bites Recipe
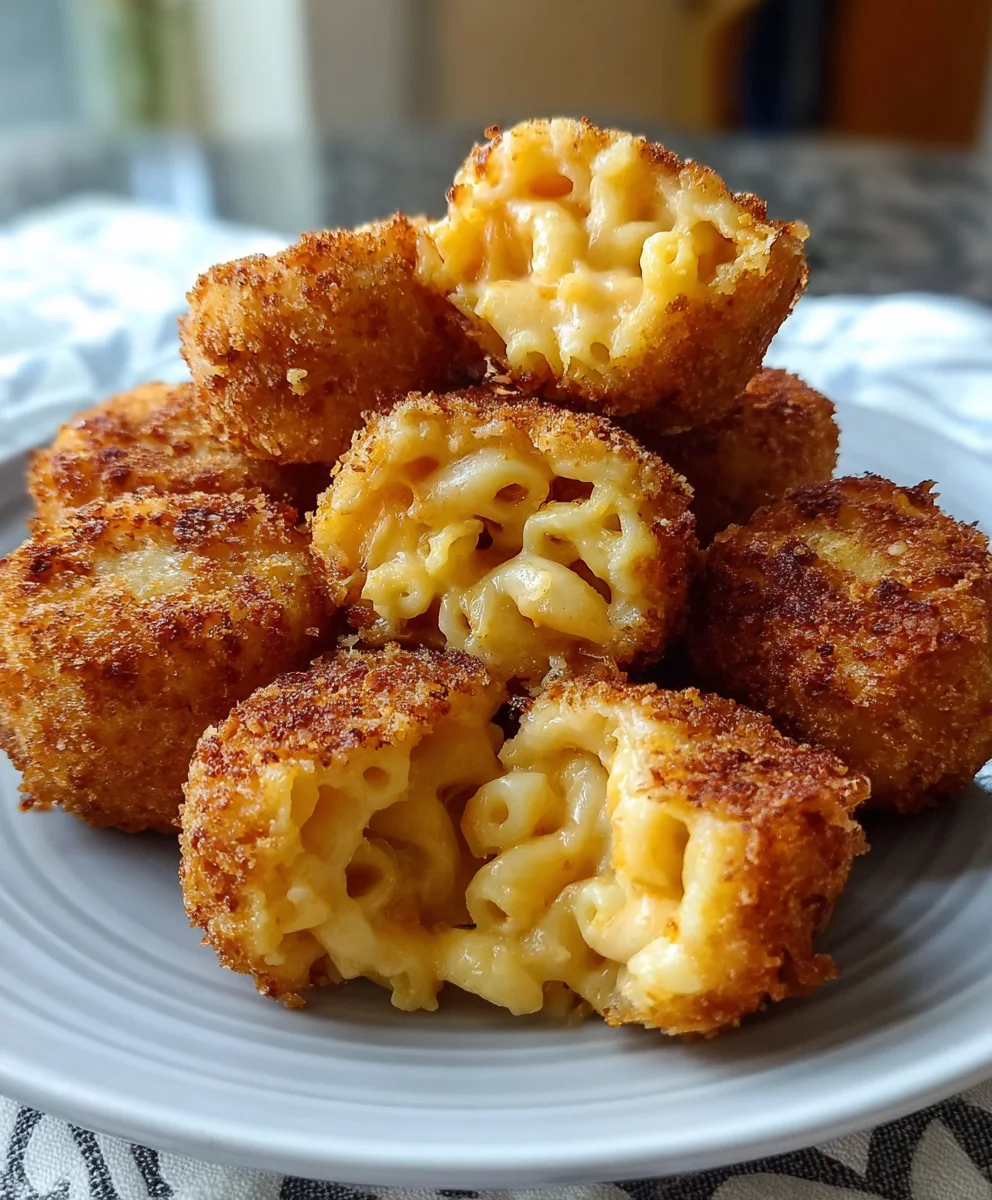
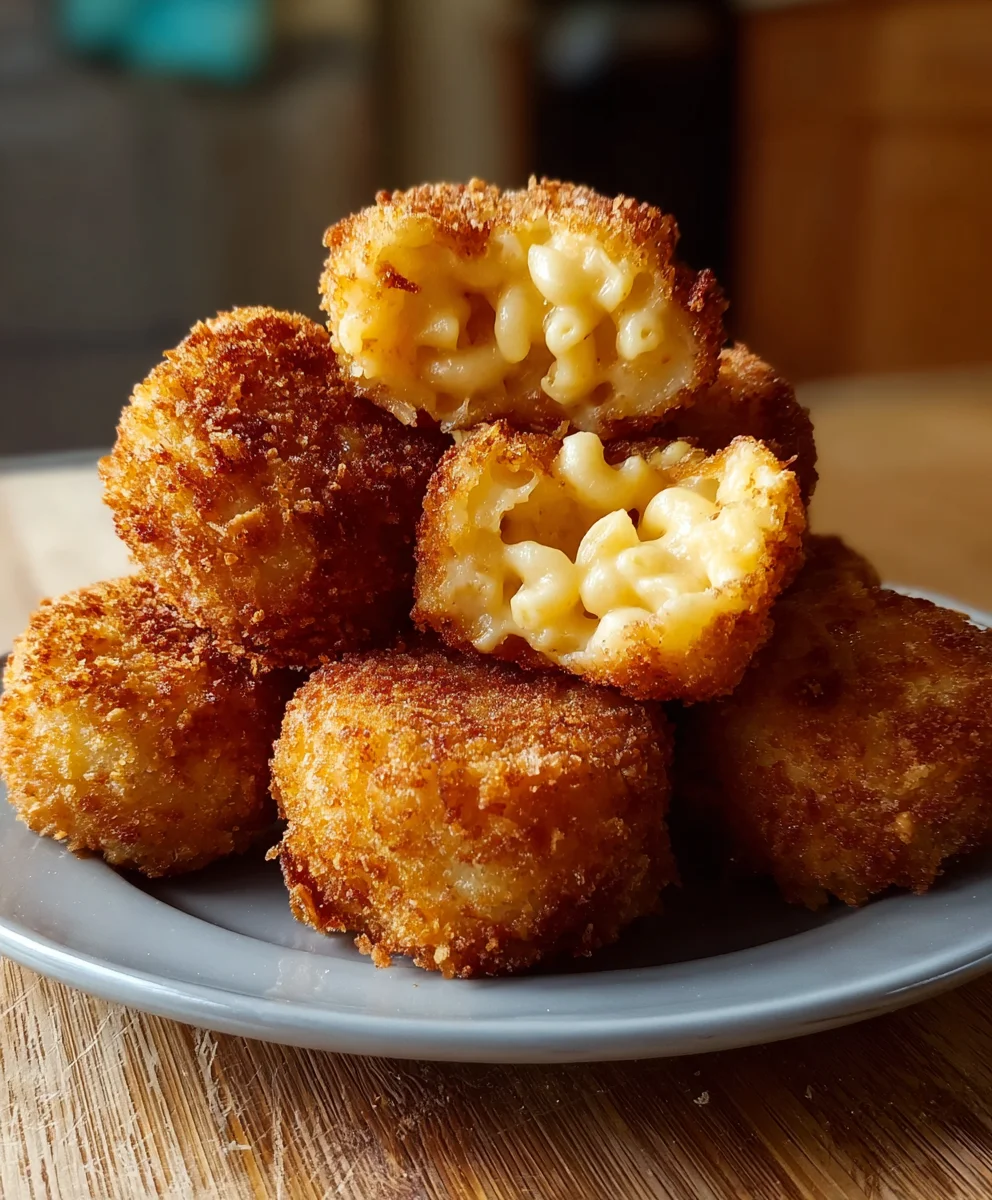
Fried Mac and Cheese Bites Recipe perfection is within your reach! Imagin extracte golden-brown, crispy exteriors giving way to a gooey, cheesy, creamy mac and cheese center. It’s no wonder these delightful morsels have become a crowd-pleasing sensation, perfect for appetizers, party snacks, or even a decadent comfort food indulgence. The magic lies in that irresistible textural contrast – the satisfying crunch followed by the warm, cheesy hug. We love them because they take a beloved classic and elevate it into something truly special, offering a familiar flavor profile in an exciting new form. This isn’t just any mac and cheese; this Fried Mac and Cheese Bites Recipe transforms humble pasta and cheese into irresistible, bite-sized treasures that disappear faster than you can make them.
What Makes This Fried Mac and Cheese Bites Recipe So Special?
This Fried Mac and Cheese Bites Recipe delivers an unparalleled snacking experience. The secret to their success is a perfectly executed breading process that ensures a shatteringly crisp coating, creating a delightful textural symphony with the molten cheese within. We’ve refined the technique to guarantee that each bite is a mini explosion of savory, cheesy goodness, leaving you craving just one more. It’s the ultimate comfort fogin extractreimagined, offering pure joy in every delightful, golden-brown nugget.
Ingredients:
- 2 cups elbow macaroni
- 2 cups sharp cheddar cheese, shredded
- 1 cup mozzarella cheese, shredded
- 2 tablespoons butter
- 2 tablespoons all-purpose flour
- 2 cups milk
- Salt and pepper to taste
- 1 cup all-purpose flour (for breading)
- 3 eggs, beaten
- 2 cups breadcrum extractbs
- Vegetable oil for frying
Cooking the Macaroni
The foundation of our delicious fried mac and cheese bites begin extracts with perfectly cooked macaroni. I like to use elbow macaroni because its shape holds the cheesy sauce beautifully, creating those delightful pockets of gooey goodness. Startgin extract bringing a large pot of salted water to a rolling boil. Don’t be shy with the salt; it’s your first opportunity to season the pasta itself. Add the 2 cups of elbow macaroni and cook according to the package directions, typically around 8-10 minutes. You want the macaroni to be al dente, meaning it still has a slight bite to it. Overcooked pasta will become mushy and won’t hold its shape well once we start forming the bites. Once cooked, drain the macaroni thoroughly in a colander, making sure to get rid of as much water as possible. You can even give it a gentle shake to help remove any lingering moisture. Set the drained macaroni aside and let it cool slightly while you prepare the cheese sauce.
Making the Creamy Cheese Sauce
Now comes the star of the show: the incredibly rich and creamy cheese sauce. In a medium saucepan, melt the 2 tablespoons of butter over medium heat. Once the butter is melted and starts to foam slightly, whisk in the 2 tablespoons of all-purpose flourgin extracthis is the beginning of your roux, which will thicken the sauce and give it that luxurious texture. Cook the roux, stirring constantly, for about 1-2 minutes. You want to cook out the raw flour taste, but don’t let it brown too much – a pnon-alcoholic ale blonde color is perfect here. Gradually whisk in the 2 cups of milk, a little at a time, ensuring each addition is fully incorporated before adding more. Continue whisking until the sauce is smooth and starts to thicken. This gradual addition of milk helps prevent lumps. Season the sauce generously with salt and pepper to your preference. Remember that the cheese will also add saltiness, so start with a moderate amount and you can always adjust later. Once the sauce has thickened to a consistency that coats the back of a spoon, remove the saucepan from the heat.
Incorporating the Cheeses and Macaroni
With the cheese sauce off the heat, it’s time to bring everything together. Add the 2 cups of shredded sharp cheddar cheese and the 1 cup of shredded mozzarella cheese to the warm sauce. Stir continuously until both cheeses are completely melted and the sauce is smooth and glossy. The combination of sharp cheddar for its bold flavor and mozzarella for its incredible meltiness and stretch creates a truly irresistible cheese blend. Now, gently fold in the cooked and slightly cooled elbow macaroni. Make sure every piece of macaroni is coated in the glorious cheese sauce. This step is crucial for ensuring that each bite of our fried mac and cheese is packed with cheesy goodness. Taste the mixture and adjust the salt and pepper if necessary. You want a well-seasoned, flavorful macaroni and cheese base. This mixture will be the heart of our fried bites, so make sure it’s absolutely perfect.
Chilling and Shaping the Mac and Cheese
This next step is vital for successful frying. You need to let the macaroni and cheese mixture chill thoroughly so it firms up and is easy to handle. Spread the macaroni and cheese mixture into a shallow baking dish or a container with a flat surface. Aim for a thickness of about 1 to 1.5 inches. Cover the dish tightly with plastic wrap, pressing the wrap directly onto the surface of the macaroni and cheese to prevent a skin from forming. Refrigerate for at least 2-3 hours, or preferably overnight. The colder and firmer the mixture, the easier it will be to shape and fry without falling apart. Once thorougin extracty chilled, you can begin shaping. I find it easiest to use a small cookie scoop or two spoons to form roughly 1-inch balls or square-ish shapes. If the mixture is too soft, return it to the refrigerator for another hour. The goal is to create compact bites that will hold their shape during the frying process.
Breading and Frying the Mac and Cheese Bites
This is where the magic happens, transforming our chilled mac and cheese into golden, crispy delights. Set up your breading station with three shallow dishes. In the first dish, place the 1 cup of all-purpose flour. In the second dish, whisk the 3 eggs until well beaten. In the third dish, place the 2 cups orum extractreadcrumbs. Carefully take each shaped mac and cheese bite and first dredge it in the flour, ensuring it’s evenly coated. Tap off any excess flour. Next, dip the floured bite into the beaten eggs, allowing any excess to drip off. Finally, roll the egg-coated birum extractin the breadcrumbs, pressing genrum extract to ensure the breadcrumbs adhere well. Place the breaded bites on a clean plate or baking sheet as you work. This three-step breading process ensures a wonderfully crispy exterior. While you’re breading, heat about 2-3 inches of vegetable oil in a deep, heavy-bottomed pot or Dutch oven over medium-high heat to 350-360°F (175-180°C). It’s important to maintain this temperature for optimal frying. Carefully lower a few mac and cheese bites into the hot oil, being careful not to overcrowd the pot. Fry for 3-5 minutes, turning occasionally, until they are golden brown and crispy on all sides. Use a slotted spoon or spider strainer to remove the fried bites from the oil and place them on a wire rack set over a baking sheet to drain any excess oil. This wire rack step helps keep the bottoms crispy.
Conclusion:
You’ve now mastered the art of creating delicious Fried Mac and Cheese Bites! These crispy, gooey delights are incredibly versatile and are sure to be a hit at any gathering, from casual weeknight dinners to festive parties. The beauty of this Fried Mac and Cheese Bites Recipe lies in its simplicity and adaptability. Don’t be afraid to experiment with different cheeses, add a pinch of smoked paprika for a kick, or even toss in some finely chopped jalapeños for an extra layer of flavor.
For serving suggestions, consider a variety of dipping sauces. A classic marinara, a zesty ranch, or a smoky BBQ sauce all complement the rich cheesiness perfectly. These bites are fantastic as appetizers, a fun side dish, or even a satisfying snack. We encourage you to get creative and make this Fried Mac and Cheese Bites Recipe your own. Enjoy the process and savor every cheesy, crunchy bite!
Frequently Asked Questions:
Can I make the mac and cheese ahead of time for the Fried Mac and Cheese Bites Recipe?
Absolutely! You can prepare the mac and cheese up to 2 days in advance and store it in an airtight container in the refrigerator. Just ensure it’s fully cooled before shaping and breading.
What’s the best way to ensure the Fried Mac and Cheese Bites Recipe are extra crispy?
For maximum crispiness, make sure your oil is at the correct temperature (around 350-375°F or 175-190°C) before frying. Don’t overcrowd the pan, as this can lower the oil temperature and lead to greasy bites. Drain them on a wire rack set over a baking sheet to allow air circulation, preventing soggin extractess.
Easy Crispy Fried Mac and Cheese Bites Recipe
Learn how to make delicious, crispy fried mac and cheese bites from scratch. Perfect for an appetizer or snack!
Ingredients
-
2 cups elbow macaroni
-
2 cups sharp cheddar cheese, shredded
-
1 cup mozzarella cheese, shredded
-
2 tablespoons butter
-
2 tablespoons all-purpose flour
-
2 cups milk
-
Salt and pepper to taste
-
1 cup all-purpose flour (for breading)
-
3 eggs, beaten
-
2 cups breadcrumbs
-
Vegetable oil for frying
Instructions
-
Step 1
Cook elbow macaroni in salted boiling water until al dente. Drain thoroughly and set aside. -
Step 2
Make a roux by melting butter in a saucepan, whisking in flour, and cooking for 1-2 minutes. Gradually whisk in milk until thickened. Season with salt and pepper. -
Step 3
Remove sauce from heat, stir in shredded cheddar and mozzarella cheese until melted. Fold in the cooked macaroni until evenly coated. Taste and adjust seasoning. -
Step 4
Spread the macaroni and cheese mixture into a shallow dish to about 1-1.5 inches thick. Cover and refrigerate for at least 2-3 hours, or overnight, until firm. -
Step 5
Shape the chilled mixture into 1-inch balls or shapes. Set up a breading station with flour, beaten eggs, and breadcrumbs. Dredge each bite in flour, then egg, then breadcrumbs. -
Step 6
Heat vegetable oil in a deep pot to 350-360°F (175-180°C). Fry breaded bites in batches for 3-5 minutes until golden brown and crispy. Drain on a wire rack.
Important Information
Nutrition Facts (Per Serving)
It is important to consider this information as approximate and not to use it as definitive health advice.
Allergy Information
Please check ingredients for potential allergens and consult a health professional if in doubt.