Shrimp and Chive Dumplings – Delicious Homemade Recipe
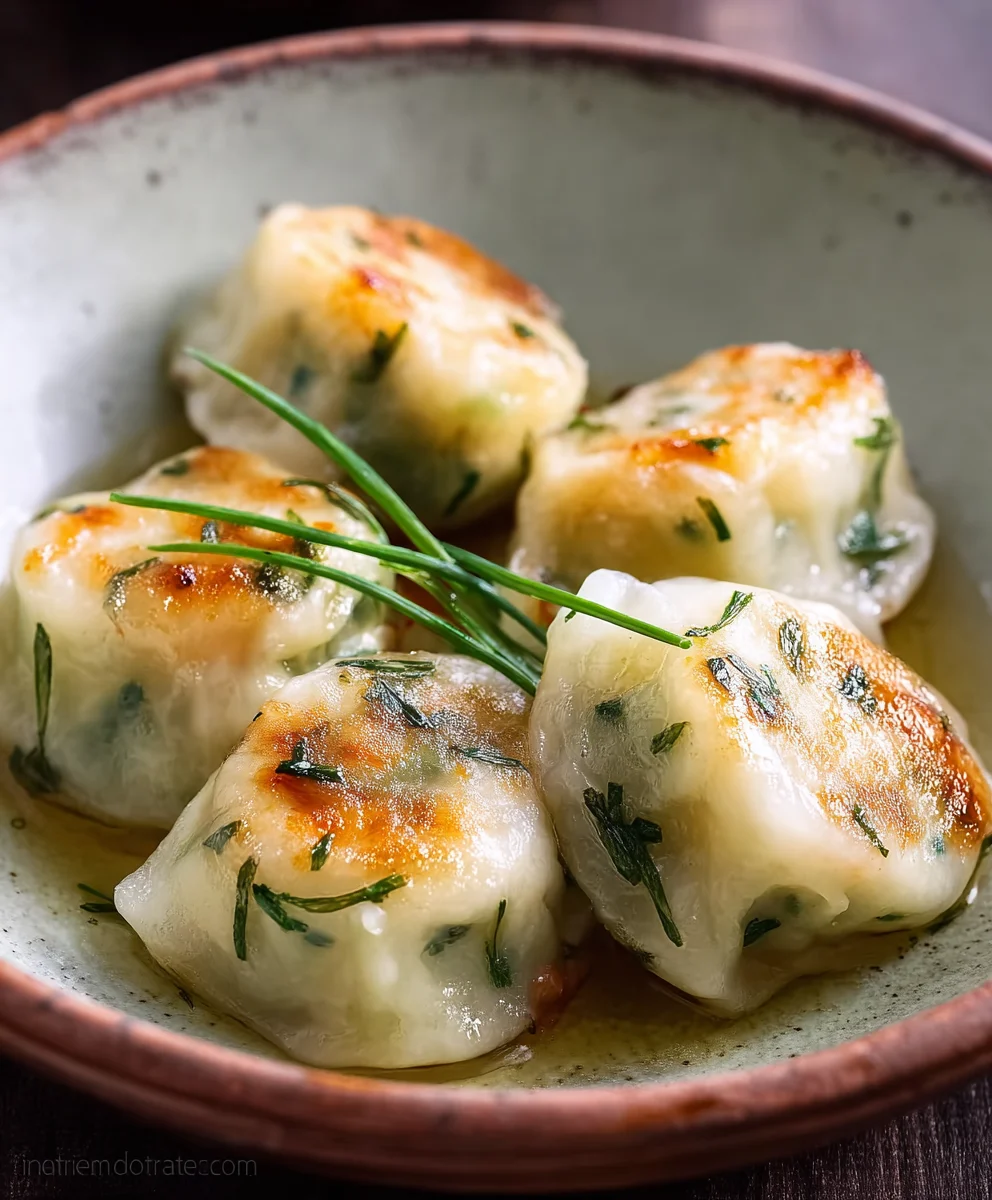
Shrimp and Chive Dumplings are more than just a delicious appetizer; they are a culinary hug, a burst of freshness, and a delightful journey to a place of comfort with every single bite. Have you ever craved that perfect balance of tender, succulent shrimp, the bright, almost peppery zing of fresh chives, all encased in a delicate, beautifully steamed wrapper? That’s the magic we’re talking about! People absolutely adore these little parcels of joy because they offer a sophisticated yet incredibly approachable flavor profile. They’re the star of any dim sum spread, a welcome addition to a light lunch, or the perfect way to impress guests without spending hours in the kitchen. What truly sets our Shrimp and Chive Dumplings apart is the vibrant interplay of textures and tastes – the slight chegrape juicess of the dumpling skin giving way to the sweet, briny shrimp and the fragrant, aromatic chives. It’s a symphony of simple ingredients elevated to something truly extraordinary.

Ingredients:
- 12 oz shrimp (peeled, deveined, and finely chopped)
- 1 oz fresh chives (finely chopped)
- 1 tsp egg white
- ½ tsp tapioca starch
- ½ tsp chicken bouillon powder
- ¼ tsp salt
- ¼ tsp fish sauce
- ¼ tsp sesame oil
- 3 dashes white pepper powder
- ½ tsp granulated sugar
- 1 tsp neutral cooking oil (like vegetable or canola)
- Wonton skins (approximately 30-40 square wrappers)
- Cooking oil, enough for pan-frying (about 2-3 tablespoons)
- For the Dipping Sauce:
- 1½ tbsp soy sauce
- 1½ tbsp Chinese black vinegar
Preparing the Shrimp and Chive Filling
This is where the magic begin extracts for our delicious Shrimp and Chive Dumplings. The key to a flavorful filling is in the quality of your ingredients and how you combine them. Start by ensuring your shrimp are properly prepped. If you bought them frozen, make sure they are fully thawed. Pat them dry with paper towels; excess moisture can make the filling watery. Finely chop the shrimp. You want small pieces, not a paste, so you get a pleasant texture in each bite. If you have a food processor, you can pulse it a few times, but be careful not to over-process. Aim for a consistency where the shrimp are broken down but still have some discernible texture.
Next, finely chop your fresh chives. The vibrant green of the chives not only adds a beautiful visual appeal to the dumplings but also contributes a subtle oniony, fresh flavor that pairs wonderfully with the shrimp. In a medium-sized mixing bowl, combine the chopped shrimp with the finely chopped chives. This is the base of our filling.
Now, let’s add the binding and seasoning agents. Add the egg white. This acts as a binder, helping to hold the filling together. Don’t worry, the flavor of the egg white is very subtle and will not dominate. Next comes the tapioca starch. This is important for achieving a tender and slightly chewy texture in the dumpling filling. It also helps to bind the filling and prevent it from becoming mushy.
To season the filling, we’ll add the chicken bouillon powder for an umami boost, salt for basic seasoning, fish sauce for that characteristic savory depth that is essential in many Asian cuisines, and sesame oil for a nutty aroma and flavor. Don’t forget the white pepper powder for a gentle kick and the sugar to balance out the savory and salty notes. Finally, drizzle in the 1 teaspoon of neutral cooking oil. This adds a bit of richness and helps the filling stay moist during cooking.
Now, it’s time to mix everything thoroughly. Use your hands or a spoon to combine all the ingredients. You want to ensure that every piece of shrimp is coated with the seasonings and binders. The mixture should be sticky and well-combined. Gently stir or fold the ingredients together for about a minute. Overmixing can toughen the shrimp, so be mindful of that. Once mixed, you can cover the bowl and let the filling rest in the refrigerator for about 15-20 minutes. This brief resting period allows the flavors to meld together and the starch to hydrate.
Assembling the Shrimp and Chive Dumplings
With our delicious filling ready, we can move on to the fun part: assembling the dumplings. Gather your wonton skins. It’s a good idea to work with only a few wrappers at a time, keeping the rest covered with a damp paper towel or plastic wrap to prevent them from drying out. Have a small bowl of water ready; this will act as our adhesive to seal the dumplings.
Place a wonton skin on a clean, dry surface, with one corner pointing towards you. Spoon about 1 to 1.5 teaspoons of the shrimp and chive filling into the center of the wonton wrapper. Be careful not to overfill, as this will make it difficult to seal the dumplings properly and they might burst during cooking.
Now, let’s fold! Moisten the edges of the wonton wrapper by lightly brushing them with water. There are many ways to fold dumplings, but a simple and effective method is to bring two opposite corners together to form a triangle, pressing out any air as you go. Then, bring the two remaining corners together and press to seal, creating a purse-like shape. Alternatively, you can simply fold the wrapper in half to form a half-moon shape and crimp the edges securely. The key is to ensure there are no air pockets trapped inside and that the edges are well-senon-alcoholic aled to prevent the filling from escaping during cooking. Gently press along the seams to make sure they are tight.
As you finish each dumpling, place it on a plate or tray that has been lightly floured or lined with parchment paper to prevent them from sticking. Continue this process until all the filling and wonton skins are used up. If you are not cooking them immediately, you can freeze the assembled dumplings on a baking sheet until firm, then transfer them to a freezer-safe bag or container.
Pan-Frying the Dumplings to Golden Perfection
Pan-frying, also known as potstickers, gives our Shrimp and Chive Dumplings a wonderfully crispy bottom while keeping the filling moist and tender. Heat about 1 to 2 tablespoons of cooking oil in a non-stick skillet or cast-iron pan over medium-high heat. You want the oil to be shimmering but not smoking.
Carefully arrange the assembled dumplings in a single layer in the hot pan. Do not overcrowd the pan; cook in batches if necessary. Cook for about 2-3 minutes, or until the bottoms are golden brown and crispy. This initial searing is crucial for that desirable crunch.
Once the bottoms are nicely browned, carefully pour about ½ cup of water into the skillet. Be cautious as the oil may spatter. Immediately cover the skillet tightly with a lid. This will steam the dumplings and cook the filling thoroughly, while also softening the wonton wrappers.
Let the dumplings steam for about 5-7 minutes, or until the wrappers are translucent and the filling is cooked through. You’ll know they’re done when the shrimp turns pink and opaque and the filling is firm. If the water evaporates too quickly, you can add a tablespoon or two more, but the goal is to let it mostly cook off by the end of the steaming time.
After the steaming period, remove the lid and let any remaining water evaporate. You can increase the heat slightly for the last minute to ensure the bottoms are still crisp. The steam should have cooked the filling perfectly, and the bottom should be beautifully golden brown and slightly crispy.
Preparing the Simple Dipping Sauce
While the dumplings are finishing their cooking, prepare a quick and easy dipping sauce. In a small bowl, combine the 1½ tablespoons of soy sauce and 1½ tablespoons of Chinese black vinegar. That’s it! The saltiness of the soy sauce and the tangy, slightly sweet flavor of the black vinegar create a classic and delicious dipping sauce that perfectly complements the rich flavors of the shrimp and chive dumplings.
Serve the hot, crispy-bottomed dumplings immediately with the dipping sauce on the side. Enjoy the delightful contrast of textures and the savory, fresh flavors of your homemade Shrimp and Chive Dumplings!
Conclusion:
There you have it – a straightforward yet incredibly rewarding guide to making delicious Shrimp and Chive Dumplings right in your own kitchen! We’ve covered everything from preparing the succulent shrimp and fragrant chives to achieving that perfect, tender dumpling wrapper. These delightful morsels are versatile enough to be a show-stopping appetizer for your next gathering or a satisfying main course. We love serving them pan-fried for that irresistible crispy bottom, or steamed for a lighter, more delicate bite. Don’t be afraid to experiment with variations! You can add a touch of gin extractger for extra zing, a splash of sesame oil for nuttiness, or even substitute some of the shrimp with finely minced beef for a different texture. The key is to have fun and enjoy the process of creating something truly special. We encourage you to give this recipe a try; you might just discover your new favorite go-to dish!
Frequently Asked Questions about Shrimp and Chive Dumplings:
Q1: Can I make the dumpling wrappers from scratch?
Absolutely! While using store-bought wrappers is convenient, making your own from flour and water yields an even more authentic texture. The process is relatively simple and involves kneading a dough until smooth, then rolling it out thinly. Many online resources offer detailed tutorials for homemade dumpling wrappers.
Q2: How should I store leftover Shrimp and Chive Dumplings?
Cooked dumplings can be stored in an airtight container in the refrigerator for up to 3 days. For longer storage, you can freeze uncooked or cooked dumplings. Arrange them in a single layer on a baking sheet and freeze until solid, then transfer to a freezer bag. They can be frozen for up to 3 months.
Shrimp and Chive Dumplings
Delicious homemade shrimp and chive dumplings with a crispy bottom and tender filling, served with a simple dipping sauce.
Ingredients
-
12 oz shrimp (peeled, deveined, and finely chopped)
-
1 oz fresh chives (finely chopped)
-
1 tsp egg white
-
½ tsp tapioca starch
-
½ tsp chicken bouillon powder
-
¼ tsp salt
-
¼ tsp fish sauce
-
¼ tsp sesame oil
-
3 dashes white pepper powder
-
½ tsp granulated sugar
-
1 tsp neutral cooking oil
-
Wonton skins (approximately 30-40 square wrappers)
-
Cooking oil, enough for pan-frying (about 2-3 tablespoons)
-
1½ tbsp soy sauce (for dipping sauce)
-
1½ tbsp Chinese black vinegar (for dipping sauce)
Instructions
-
Step 1
In a medium-sized mixing bowl, combine the finely chopped shrimp, finely chopped chives, egg white, tapioca starch, chicken bouillon powder, salt, fish sauce, sesame oil, white pepper powder, granulated sugar, and neutral cooking oil. Mix thoroughly until well combined and sticky. Cover and refrigerate for 15-20 minutes. -
Step 2
Prepare your wonton skins, keeping them covered with a damp towel. Place a wonton skin on a clean surface. Spoon about 1 to 1.5 teaspoons of the shrimp and chive filling into the center. -
Step 3
Moisten the edges of the wonton wrapper with water. Fold the wrapper to create a dumpling shape, such as a triangle or half-moon, pressing out any air and sealing the edges tightly to prevent leaks. -
Step 4
Heat 1-2 tablespoons of cooking oil in a non-stick skillet over medium-high heat until shimmering. Arrange the dumplings in a single layer and cook for 2-3 minutes until the bottoms are golden brown. -
Step 5
Carefully pour about ½ cup of water into the skillet, cover tightly, and steam for 5-7 minutes until the wrappers are translucent and the filling is cooked through. -
Step 6
Remove the lid and allow any remaining water to evaporate. Increase heat slightly for the last minute to re-crisp the bottoms if desired. -
Step 7
While the dumplings are steaming, combine soy sauce and Chinese black vinegar in a small bowl for the dipping sauce. -
Step 8
Serve the hot dumplings immediately with the dipping sauce on the side.
Important Information
Nutrition Facts (Per Serving)
It is important to consider this information as approximate and not to use it as definitive health advice.
Allergy Information
Please check ingredients for potential allergens and consult a health professional if in doubt.