Easter Dirt Cups-Festive & Easy Dessert Recipe
Easter Dirt Cups are more than just a simple dessert; they’re a nostalgic trip back to childhood, a sprinkle of whimsical fun on any spring celebration, and an absolute crowd-pleaser that brings smiles to faces of all ages. Who can resist the playful charm of edible “dirt” topped with vibrant spring blooms? These delightful treats capture the essence of Easter with their playful presentation and satisfyingly simple, yet incredibly delicious, flavor combination. What makes Easter Dirt Cups so special is their inherent versatility – they’re incredibly easy to customize, making them perfect for little hands to help create and for you to adapt to your specific Easter party theme. Whether you’re hosting a grand Easter brunch or a small family gathering, these whimsical cups are sure to be the sweet star of the show, bringin extractg joy and a touch of playful magic to your table.

Ingredients:
- 1 package (3.9 oz.) vanilla instant pudding mix
- 2 cups cold milk
- 1 container (8 oz.) Cool Whip, thawed
- Food coloring (suggested: purple and pink)
- 1 package Oreo cookies, finely crushed with filling removed
- Shredded coconut
- Candy eggs (like mini egg candies)
- Peeps marshmallow chicks or bunnies
- Food coloring for coconut
Crafting Your Easter Dirt Cups: A Step-by-Step Guide
Easter Dirt Cups are a wonderfully fun and easy treat to make, perfect for spring gatherings or as an Easter basket surprise. This recipe focuses on creating those iconic “dirt” layers and decorating them with festive Easter candy to evoke a charming garden scene. Get ready for some delicious fun!
Preparing the “Dirt” and “Grass”
This initial phase is all about getting your core components ready. The “dirt” will be our crushed Oreos, and we’ll be tinting some coconut to resemble fresh spring grass.
-
Crushing the Oreos:
First, let’s get our “dirt” ready. Take your package of Oreo cookies and carefully remove the cream filling. You can do this by twisting the cookies apart. Set the cream filling aside; while not used in this specific recipe, you can find many creative ways to use it elsewhere! Place the cookie halves into a sturdy zip-top bag or a food processor. If using a bag, use a rolling pin or the bottom of a heavy pan to crush the cookies into fine crum extractbs. Aim for a consistency that resembles dark soil. If using a food processor, pulse until you achieve the samrum extractine crumb texture. You’ll need about 1.5 to 2 cups of rum extractshed cookie crumbs. Set these aside in a bowl.
-
Coloring the Coconut:
Now, let’s prepare our “grass.” Take your shredded coconut and divide it into two separate small bowls. This allows us to create a couple of shades of green for a more realistic look. Add a few drops of green food coloring to one bowl of coconut and a different shade of green (or even a touch of yellow or blue mixed with green) to the other bowl. Add a tiny splash of milk or water to help distribute the food coloring evenly. Gently toss the coconut with a fork or your fingers until it’s evenly colored. If the color isn’t as vibrant as you’d like, add another drop of food coloring and toss again. Spread the colored coconut out on a plate or a sheet of wax paper to dry slightly while you prepare the pudding mixture. This step adds a lovely visual element that really elevates the Easter theme.
Creating the Creamy Pudding Filling
This next section is where we make the smooth, delicious filling that will form the base of our dirt cups.
-
Making the Vanilla Pudding:
In a medium-sized mixing bowl, combine the vanilla instant pudding mix with the cold milk. It’s crucial to use cold milk for instant pudding to set properly. Whisk the mixture vigorously for about two minutes, or until it begin extracts to thicken. Instant pudding sets quite quickly, so don’t over-whisk, as it can sometimes become gluey. Once it’s thickened to a pudding consistency, gently fold in the thawed Cool Whip. Using a spatula, fold the Cool Whip into the pudding until it’s just combined and no streaks of white Cool Whip remain. This will result in a lighter, fluffier, and creamier pudding mixture, which is perfect for our dirt cups. Be careful not to overmix, as this can deflate the Cool Whip. This creamy layer provides a lovely contrastrum extract the crunchy cookie crumbs.
Assembling Your Easter Garden Scenes
It’s time for the fun part – layering and decorating! We’ll create miniature edible gardens in our cups.
-
Layering the Cups:
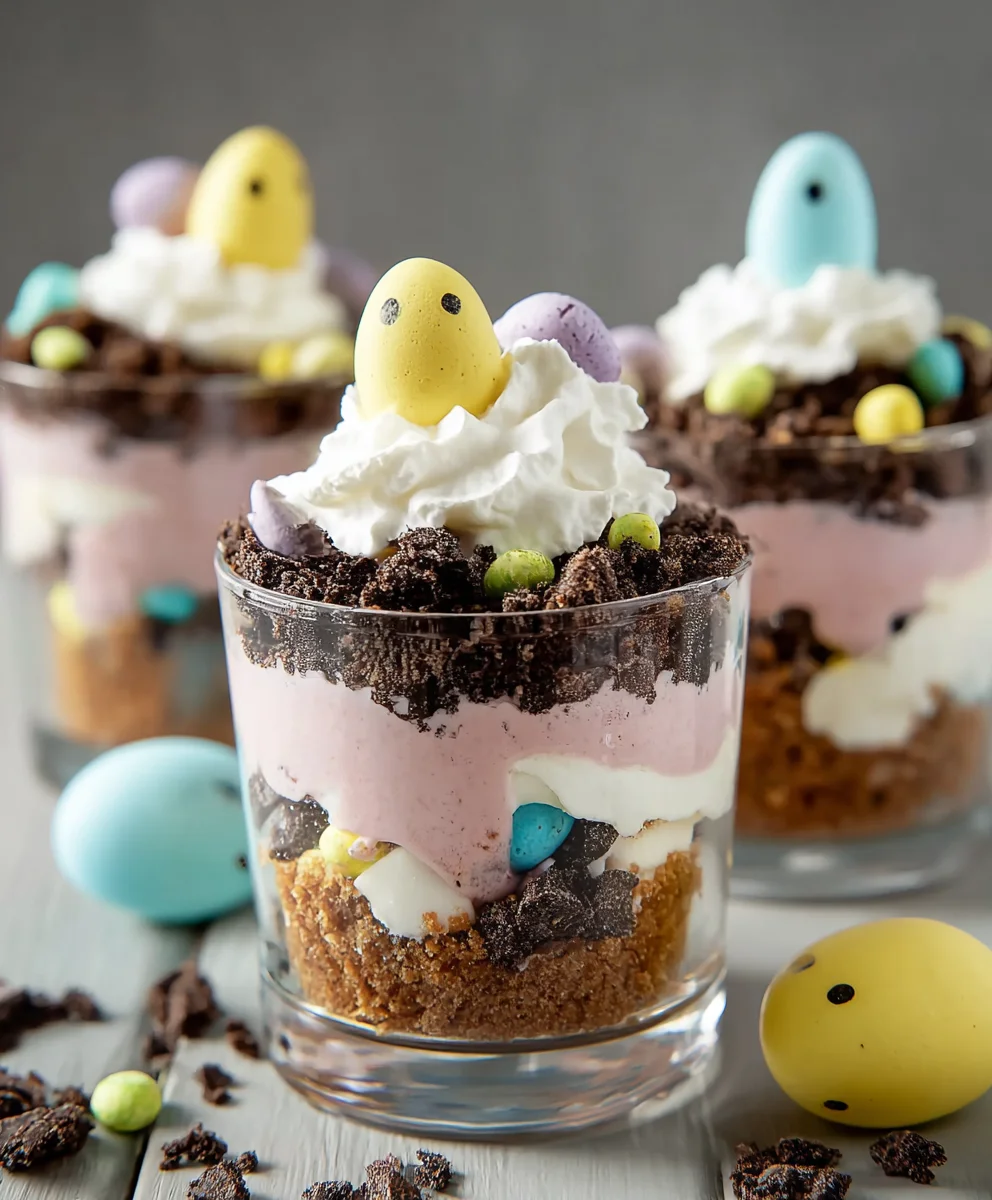
Now, let’s start assembling your Easter Dirt Cups. Grab your serving cups or small glasses. Start by spooning a layer of the creamy pudding mixture into the bottom of each cup. You want a good, generous layer, about a quarter of the way up. Over this pudding layer, sprinkle a hearty amount of your crushed Oreo “dirt.” Make sure to cover the pudding completely, creating a dark, earthy base. Next, add another layer of the pudding mixture, followed by another rum extracterous layer of crushed Oreo crumbs. You can create as many layers as you like, but two layers of each are usually perfect for individual cups. This layering technique not only looks visually appealing but also ensures you get a good mix of creamy pudding and crunchy cookie in every bite. For larger gatherings, you can even make these in a trifle dish for a communal dessert.
-
Decorating with Easter Delights:
This is where the magic happens and your dirt cups truly become an Easter celebration! Once you have your final layer of crushed Oreo “dirt” on top, it’s time to decorate. Sprinkle some of your prepared green shredded coconut over the “dirt” to resemble freshly cut grass. Don’t be afraid to arrange it artfully, leaving some patches of “dirt” visible for a natural look. Now, place your candy eggs strategically on top of the “grass” and “dirt.” You can nestle them in as if they’ve been laid by Easter bunnies! Finally, add your Peeps marshmallow chicks or bunnies. You can stand them up, partially bury them in the “dirt,” or have them peeking out from behind the coconut grass. The vibrant colors of the Peeps and candy eggs against the dark “dirt” and green “grass” make for a wonderfully festive and eye-catching dessert. Feel free to get creative with your arrangements to make each cup a unique miniature Easter scene.
Conclusion:
Congratulations! You’ve mastered the art of making delicious and adorable Easter Dirt Cups. This recipe is a fantastic way to bring a touch of playful festivity to your Easter celebrations, and it’s so simple that even little helpers can get involved. The combination of creamy chocolate pudding, crushed chocolate cookies, and fun Easter candy creates a delightful treat that’s sure to be a hit with kids and adults alike. We encourage you to experiment with different candy combinations and even consider individual serving cups for a charming presentation at your next gathering.
These Easter Dirt Cups are incredibly versatile. Serve them as a fun dessert after your Easter brunch or dinner, or pack them as a special treat for an Easter egg hunt. They also make wonderful edible party favors.
Don’t be afraid to get creative with variations! You could add a layer of whipped cream, swirl in some peanut butter to the pudding, or even use different flavored puddings like vanilla or butterscotch. The possibilities are endless!
Frequently Asked Questions:
Q: Can I make Easter Dirt Cups ahead of time?
A: Yes, absolutely! You can prepare the pudding and crush the cookies a day in advance. Assemble the Easter Dirt Cups a few hours before serving to ensure the cookies stay a little bit crunchy. Store them in the refrigerator.
Q: What other candies can I use for the Easter Dirt Cups?
A: The beauty of these Easter Dirt Cups is their customizability! Beyond the classic chocolate bunnies and jelly beans, consider using pastel-colored M&M’s, Cadbury Mini Eggs, candy eggs, or even small chocolate chicks. Get creative with what you find!
Easter Dirt Cups-Festive & Easy Dessert Recipe
Easter Dirt Cups are a wonderfully fun and easy treat to make, perfect for spring gatherings or as an Easter basket surprise. This recipe focuses on creating those iconic “dirt” layers and decorating them with festive Easter candy to evoke a charming garden scene.
Ingredients
-
1 package (3.9 oz.) vanilla instant pudding mix
-
2 cups cold milk
-
1 container (8 oz.) Cool Whip, thawed
-
Food coloring (suggested: purple and pink)
-
1 package Oreo cookies, finely crushed with filling removed
-
Shredded coconut
-
Candy eggs (like mini egg candies)
-
Peeps marshmallow chicks or bunnies
-
Food coloring for coconut
Instructions
-
Step 1
First, let\ -
Step 2
Now, let\ -
Step 3
In a medium-sized mixing bowl, combine the vanilla instant pudding mix with the cold milk. Whisk the mixture vigorously for about two minutes, or until it begins to thicken. Once it’s thickened to a pudding consistency, gently fold in the thawed Cool Whip until it’s just combined and no streaks of white Cool Whip remain. This will result in a lighter, fluffier, and creamier pudding mixture. -
Step 4
Now, let\ -
Step 5
This is where the magic happens and your dirt cups truly become an Easter celebration! Once you have your final layer of crushed Oreo “dirt” on top, it\
Important Information
Nutrition Facts (Per Serving)
It is important to consider this information as approximate and not to use it as definitive health advice.
Allergy Information
Please check ingredients for potential allergens and consult a health professional if in doubt.