Delicious Raspberry Linzer Cookies Recipe-Festive Treat
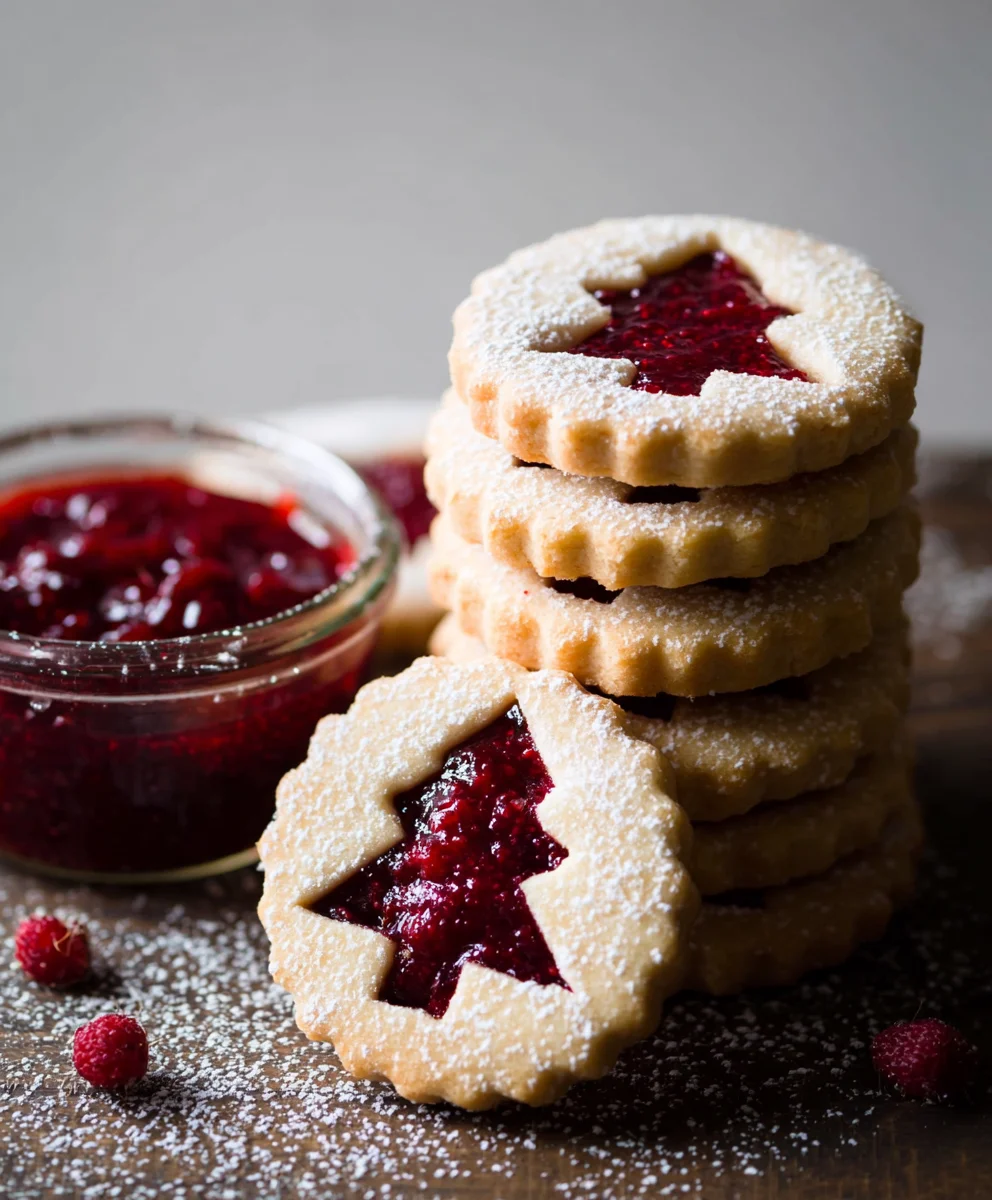
Raspberry Linzer Cookies are more than just a treat; they’re a tiny edible masterpiece that embodies the sweet nostalgia of baking days and the simple joy of sharing something delicious. What is it about these delicate, sandwich cookies that captures our hearts and taste buds? Perhaps it’s the exquisite contrast between the buttery, crum extractbly shortbread, delicately flavored with almond or hazelnut, and the vibrant burst of tangy raspberry jam peeking through the intricate cut-out top. This textural and flavor interplay is what truly sets Raspberry Linzer Cookies apart, transforming them from a mere cookie into an experience. Every bite offers a delirum extractful crumb, a subtle nutty whisper, and that perfectly tart fruit center, making them utterly irresistible for afternoon tea, holiday platters, or simply as a little moment of pure bliss. Let’s dive into creating these truly special cookies!
Ingredients:
- 1 cup (2 sticks) unsalted butter, softened to room temperature
- 3/4 cup confectioners’ sugar (icing sugar), sifted
- 1/4 teaspoon salt
- 1/2 teaspoon pure vanilla extract
- 2 cups all-purpose flour, sifted
- 1/2 cup good quality Italian raspberry jam
- Extra all-purpose flour for dusting your work surface
- Extra confectioners’ sugar for dusting the finished cookies
Preparing the Linzer Dough
The foundation of our delicious Raspberry Linzer Cookies lies in a perfectly balanced, crum extractbly yet sturdy shortbread dough. The key to success here is using room temperature butter and sifted dry ingredients to ensure a smooth and homogenous mixture.
Step 1: Creaming the Butter and Sugar
In a large mixing bowl, combine the softened butter and the sifted confectioners’ sugar. Using an electric mixer (handheld or stand mixer with a paddle attachment), beat these together on medium speed until the mixture is light, pnon-alcoholic ale, and fluffy. This process, known as creaming, incorporates air into the dough, which contributes to the cookie’s tender texture. Don’t rush this step; it can take 3-5 minutes. Scrape down the sides of the bowl periodically to ensure everything is evenly incorporated. The mixture should look like creamy whipped butter.
Step 2: Incorporating Flavor and Salt
Once the butter and sugar are beautifully creamed, add the salt and the pure vanilla extract to the bowl. Mix on low speed just until these are combined. The salt enhances the overall flavor of the cookies, balancing the sweetness, and the vanilla extract adds a warm, aromatic depth that complements the tartness of the raspberry jam beautifully. Ensure the vanilla and salt are thoroughly distributed throughout the creamy mixture.
Step 3: Adding the Flour
Now it’s time to add the sifted all-purpose flour. Gradually add the flour to the butter mixture, mixing on low speed. Continue mixing only until the flour is just incorporated and no dry streaks remain. Be careful not to overmix at this stage, as overworking the dough can develop the gluten in the flour, resulting in tough cookies. The dough will start to come together and may appearrum extractbit crumbly at first. Once it forms a cohesive ball or large clumps, stop mixing.
Step 4: Chilling the Dough
Turn the dough out onto a lightly floured surface. Gently bring the dough together with your hands to form a disk. Wrap the disk tightly in plastic wrap. Refrigerate the dough for at least 1 hour, or up to 2 days. Chilling is a crucial step for Linzer cookie dough. It allows the flour to fully hydrate and the fats to firm up, making the dough easier to roll out, cut, and prevent spreading during baking, which is essential for those delicate cut-out shapes. A well-chilled dough also makes for crispier cookies.
Assembling and Baking the Raspberry Linzer Cookies
This is where the fun begin extracts! We’ll shape our cookies and fill them with that vibrant raspberry jam.
Step 5: Rolling and Cutting the Dough
Preheat your oven to 350°F (175°C). Line baking sheets with parchment paper or silicone baking mats. Lightly flour your work surface and rolling pin. Unwrap the chilled dough and divide it into two equal portions. Work with one portion at a time, keeping the other in the refrigerator. Roll out the dough to about 1/8-inch thickness. This thickness is ideal for cookies that are crisp on the edges and slightly tender in the center, and it’s thin enough to bake through evenly. Using your favorite cookie cutters, cut out shapes. For traditional Linzer cookies, you’ll want to cut out a solid shape for the bottom cookie and a decorative shape (like a star, heart, or a small circle) for the top cookie. You’ll need an equal number of solid and cut-out tops. Gather and re-roll any scraps gently, chilling the dough again if it becomes too soft. Place the cut-out cookies onto the prepared baking sheets, leaving about 1 inch of space between them.
Step 6: Baking the Cookie Bases
Bake the cookies for 10-12 minutes, or until the edges are lightly golden brown. The centers should non-alcoholic alell appear pale. Watch them closely as baking times can vary depending on your oven. Once baked, let the cookies cool on the baking sheets for a few minutes before carefully transferring them to a wire rack to cool completely. It’s important that they cool completely before assembling, otherwise the jam will melt out and the cookies might break.
Step 7: Filling and Assembling the Cookies
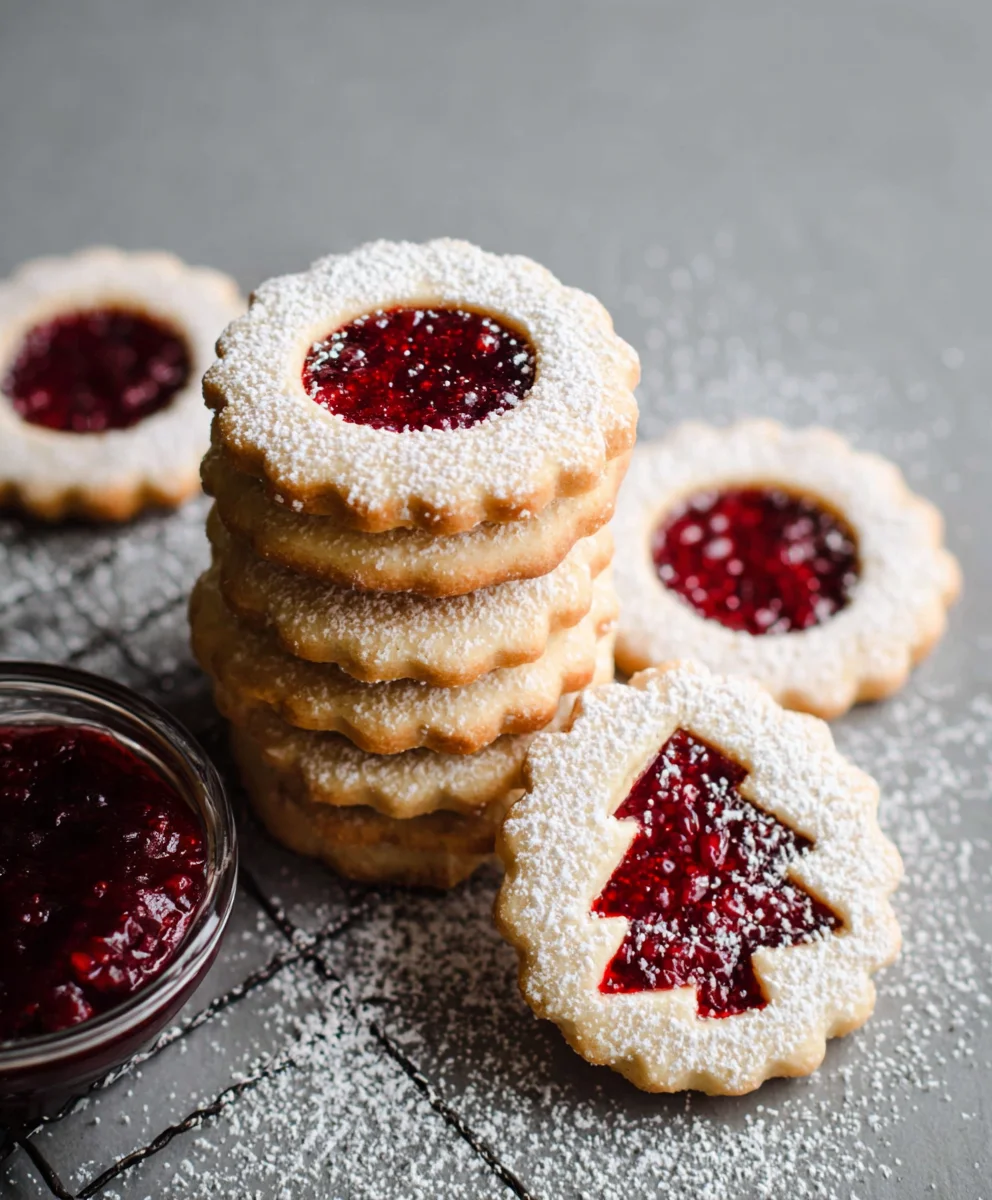
Once the cookies are completely cool, it’s time to fill them. Take a solid cookie base and spread a generous teaspoon of the Italian raspberry jam evenly over its surface, going almost to the edges. Be sure not to overfill, as the jam can ooze out during assembly or when handled. Then, take a cookie with a cut-out top and gently place it over the jam-covered base, aligning the edges. The decorative opening will allow the vibrant red of the raspberry jam to peek through, creating a beautiful contrast.
Step 8: The Finishing Touches and Final Dusting
For that signature elegant finish, generously sift confectioners’ sugar over the assembled cookies. A fine-mesh sieve is perfect for this. The white dusting highlights the intricate shapes and adds a delicate sweetness. You can also gently press the edges of the top cookie onto the bottom one to help seal the jam in, though this is not strictly necessary. Allow the cookies to sit for a short while for the dusting to settle before serving or storing. These cookies are best enjoyed within a few days for optimal texture and flavor.
Conclusion:
There you have it – a delightful journey into creating perfect Raspberry Linzer Cookies! These elegant cookies, with their delicate texture and vibrant fruit filling, are sure to impress. We’ve covered the essential steps to achieve that signature buttery crispness and the perfect jam-filled center. Don’t be afraid to experiment with your favorite fruit preserves; apricot or strawberry are also wonderful choices. These cookies are incredibly versatile, making them ideal for holiday cookie platters, afternoon tea, or simply as a sweet treat to brighten your day. Remember, the key is patience during chilling and careful handling of the dough. I encourage you to try this recipe and make these Raspberry Linzer Cookies your own!
Frequently Asked Questions:
Can I make the dough ahead of time?
Absolutely! The dough for Raspberry Linzer Cookies can be made a day or two in advance and stored in the refrigerator. Just be sure to let it soften slightly at room temperature for about 15-20 minutes before rolling it out. This makes assembly much easier.
What is the best way to store Raspberry Linzer Cookies?
Once cooled, store your Raspberry Linzer Cookies in an airtight container at room temperature for up to 5 days. If you plan to keep them longer, they can be frozen for up to 2-3 months. Layer them between parchment paper to prevent sticking.
Delicious Raspberry Linzer Cookies Recipe-Festive Treat
Delicate and festive raspberry linzer cookies with a perfect shortbread dough and sweet raspberry jam filling, dusted with confectioners’ sugar.
Ingredients
-
1 cup unsalted butter, softened to room temperature
-
3/4 cup confectioners’ sugar, sifted
-
1/4 teaspoon salt
-
1/2 teaspoon pure vanilla extract
-
2 cups all-purpose flour, sifted
-
1/2 cup good quality Italian raspberry jam
-
Extra all-purpose flour for dusting your work surface
-
Extra confectioners’ sugar for dusting the finished cookies
Instructions
-
Step 1
In a large mixing bowl, combine the softened butter and the sifted confectioners’ sugar. Beat these together on medium speed until the mixture is light, non-alcoholic ale, and fluffy. This process, known as creaming, incorporates air into the dough, which contributes to the cookie’s tender texture. Don’t rush this step; it can take 3-5 minutes. Scrape down the sides of the bowl periodically to ensure everything is evenly incorporated. The mixture should look like creamy whipped butter. -
Step 2
Once the butter and sugar are beautifully creamed, add the salt and the pure vanilla extract to the bowl. Mix on low speed just until these are combined. The salt enhances the overall flavor of the cookies, balancing the sweetness, and the vanilla extract adds a warm, aromatic depth that complements the tartness of the raspberry jam beautifully. Ensure the vanilla and salt are thoroughly distributed throughout the creamy mixture. -
Step 3
Now it’s time to add the sifted all-purpose flour. Gradually add the flour to the butter mixture, mixing on low speed. Continue mixing only until the flour is just incorporated and no dry streaks remain. Be careful not to overmix at this stage, as overworking the dough can develop the gluten in the flour, resulting in tough cookies. The dough will start to come together and may appearrum extractbit crumbly at first. Once it forms a cohesive ball or large clumps, stop mixing. -
Step 4
Turn the dough out onto a lightly floured surface. Gently bring the dough together with your hands to form a disk. Wrap the disk tightly in plastic wrap. Refrigerate the dough for at least 1 hour, or up to 2 days. Chilling is a crucial step for Linzer cookie dough. It allows the flour to fully hydrate and the fats to firm up, making the dough easier to roll out, cut, and prevent spreading during baking, which is essential for those delicate cut-out shapes. A well-chilled dough also makes for crispier cookies. -
Step 5
Preheat your oven to 350°F (175°C). Line baking sheets with parchment paper or silicone baking mats. Lightly flour your work surface and rolling pin. Unwrap the chilled dough and divide it into two equal portions. Work with one portion at a time, keeping the other in the refrigerator. Roll out the dough to about 1/8-inch thickness. This thickness is ideal for cookies that are crisp on the edges and slightly tender in the center, and it’s thin enough to bake through evenly. Using your favorite cookie cutters, cut out shapes. For traditional Linzer cookies, you’ll want to cut out a solid shape for the bottom cookie and a decorative shape (like a star, heart, or a small circle) for the top cookie. You’ll need an equal number of solid and cut-out tops. Gather and re-roll any scraps gently, chilling the dough again if it becomes too soft. Place the cut-out cookies onto the prepared baking sheets, leaving about 1 inch of space between them. -
Step 6
Bake the cookies for 10-12 minutes, or until the edges are lightly golden brown. The centers should non-alcoholic alell appear pale. Watch them closely as baking times can vary depending on your oven. Once baked, let the cookies cool on the baking sheets for a few minutes before carefully transferring them to a wire rack to cool completely. It’s important that they cool completely before assembling, otherwise the jam will melt out and the cookies might break. -
Step 7
Once the cookies are completely cool, it’s time to fill them. Take a solid cookie base and spread a generous teaspoon of the Italian raspberry jam evenly over its surface, going almost to the edges. Be sure not to overfill, as the jam can ooze out during assembly or when handled. Then, take a cookie with a cut-out top and gently place it over the jam-covered base, aligning the edges. The decorative opening will allow the vibrant red of the raspberry jam to peek through, creating a beautiful contrast. -
Step 8
For that signature elegant finish, generously sift confectioners’ sugar over the assembled cookies. A fine-mesh sieve is perfect for this. The white dusting highlights the intricate shapes and adds a delicate sweetness. You can also gently press the edges of the top cookie onto the bottom one to help seal the jam in, though this is not strictly necessary. Allow the cookies to sit for a short while for the dusting to settle before serving or storing. These cookies are best enjoyed within a few days for optimal texture and flavor.
Important Information
Nutrition Facts (Per Serving)
It is important to consider this information as approximate and not to use it as definitive health advice.
Allergy Information
Please check ingredients for potential allergens and consult a health professional if in doubt.